Major Scale Positions on Guitar
In the introductory lesson: major scale on guitar, we learned the basic intervals of the scale and some basic patterns on the guitar fretboard. These patterns are fine for getting your bearings, but eventually you'll want to free up your soloing and play the major scale across the entire fretboard.This lesson is about unboxing the major scale by visualising seven positions.
The easiest way to do this is by building patterns around each degree of the scale in question. In this case, the major scale, that's 7 degrees, with 1 being its root note. A degree is a scale tone relative to that root note - 2nd, 3rd, 4th, 5th, 6th and 7th.
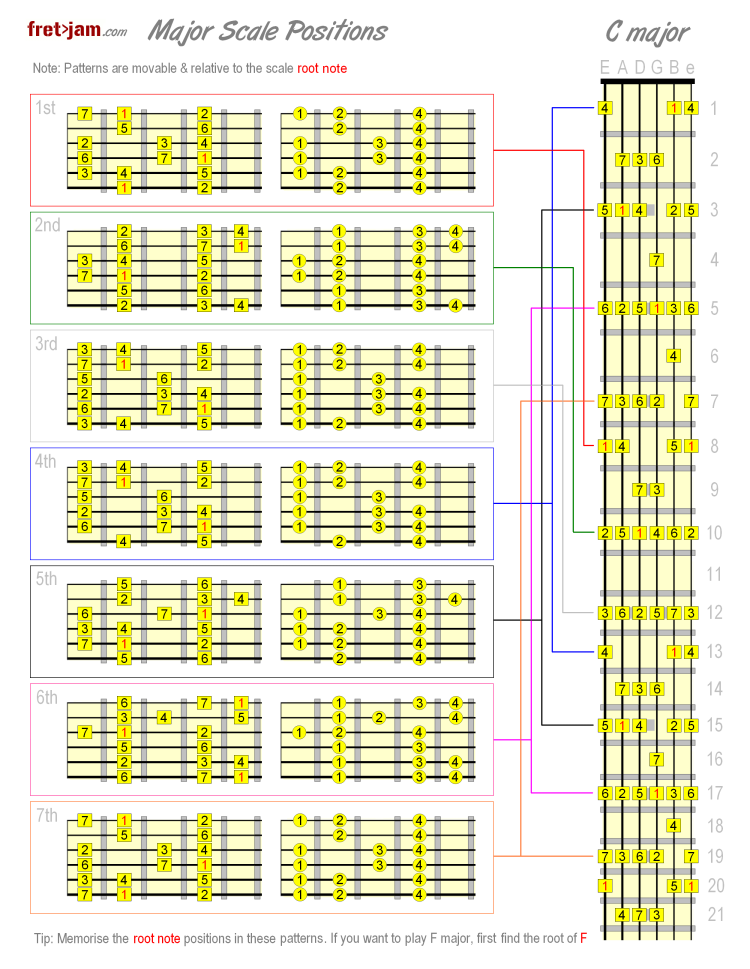
Want a printable chart of the concept we're about to look at? See the below "poster" version of this lesson (click the image to enlarge in a new window)...
The 7 major scale positions
So where do we start? The most practical first step is to make sure you've learned both the core intervals of the major scale and the box patterns from the first part. You'll see why this is helpful by connecting these same patterns within the large pattern we're about to learn (it's all about identifying the root note strings/positions).As mentioned before, the major scale's degrees are relative to its root (1) note. The position of the root note defines the key you're playing the scale in. For this example, we're going to map out the major scale's degrees based on a G root note. Therefore, we'll be playing the G major scale. But keep in mind that this large pattern we're building is movable and relative to your chosen root.
First, let's lay out the intervals of the G major scale along the low E string...

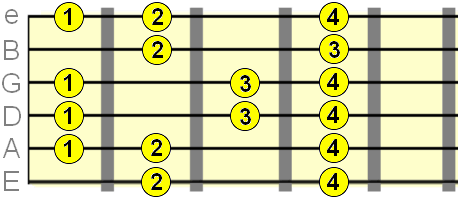
Now, we've already established that the root note is the 1st degree of the scale, and from this degree we can build it's first position pattern (one of the patterns we learned in the first part)...
1st position
This pattern also appears an octave higher at the 15th fret for G major.
3rd Fret
15th Fret
Let's now move along to the 2nd degree position. We can now build another pattern from this note. Try and especially memorise the root note positions in these patterns as this will give you the reference you need to find your bearings. For example, if you wanted to play D major, you should be able to find D on all strings.
This is one reason why it's crucial you know the notes on the fretboard!
2nd position
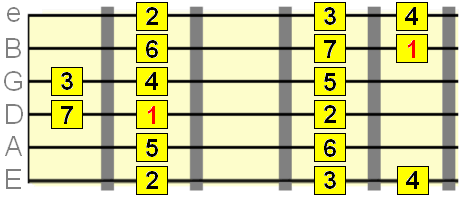
5th Fret
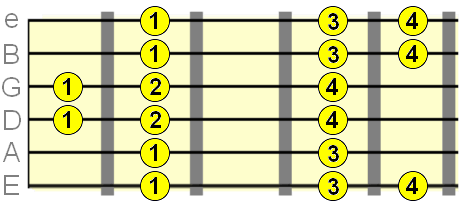
3rd and 4th positions
Because the 3rd and 4th tones of the major scale are only a semitone apart, we can merge these two positions together into one pattern...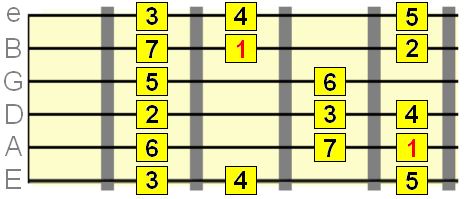
7th Fret
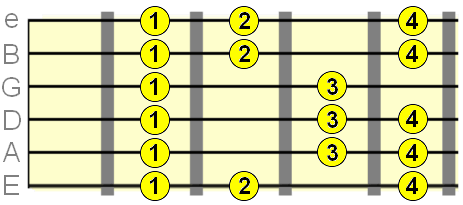
5th position
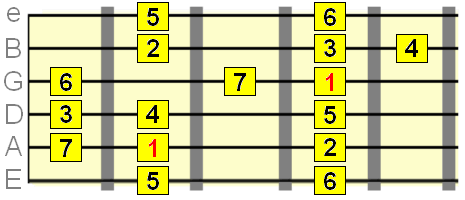
10th Fret

6th position
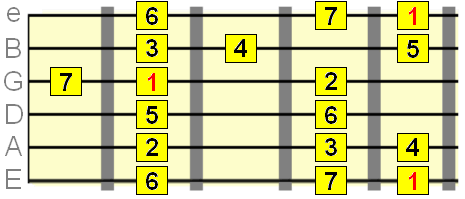
12th Fret
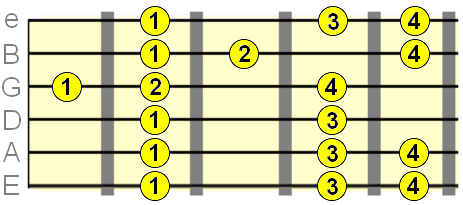
7th position
I've also marked this at the 2nd fret because we know that the 7th degree/tone of the major scale lies one semitone (fret) below the 1st degree. Therefore, as the first degree was, in this example, at the 3rd fret, the 7th degree will be one semitone lower, at the 2nd fret!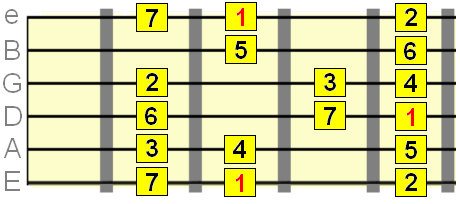
14th Fret
2nd Fret
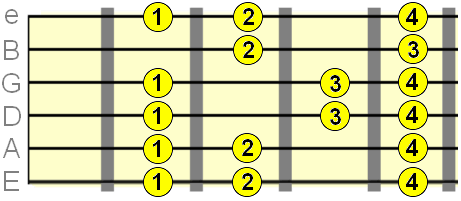
Stringing it all together
What we've done here is start a new box pattern at each degree of the G major scale, creating one large G major scale pattern across the fretboard...
So, your task here is to learn the box patterns for each degree of the major scale.
Don't just learn it in G though - these patterns are movable, and therefore the large pattern becomes movable as well. When the root (1) note gets repositioned, the rest of the pattern moves accordingly and the major scale adopts a new key center.
The great thing about this method is you can apply it to any scale. Simply lay out the scale's intervals across the low E string and map out the scale tones from each degree. Connect these patterns together and you're well on your way to navigating scales in an unrestricted and fluid way.
Once you're confident with each of the degree patterns, we can delve a little deeper into the theory...
Expanding out of boxed think
Box scale patterns are useful for three main reasons:1) They help you see convenient chord shapes that can be built around the scale you're playing (since chords essentially use the same intervals). We looked at this in part one, pulling related chord shapes out of the scale patterns.
2) They allow you to create scale runs in a confined area which is useful for quick legato playing and sweep arpeggios (more on these in the lead section!).
3) At first, they help you break down the large scale pattern into "bite sized" chunks. You can move between the boxes and keep your bearings (since you now know each scale degree's boxed pattern and where it lies in relation to the next/last!)
However, when soloing, you'll eventually want to have the option to play across larger fretboard areas seamlessly. This is about smooth, fluid movements right across the fretboard and wider interval movements across each string. Sliding is one way to utilise these wider movements, but also regular picking higher up the fretboard where the fret spacings are narrower (e.g. you may be able to span 8 frets between your index and pinky finger rather than just 4 or 5).
To help connect these boxes in your mind, we need to work on the interval relationships of the scale in various positions on the fretboard. We touched on this in the major scale lesson, but now we know the scale across a much larger area, these interval relationships can now be visualised across the entire fretboard.
Let's look at some examples, still using that large G major scale pattern. Don't worry, you won't have to do this for every scale you learn since many scales share the same core intervals...
Root - 3rd interval

Don't forget about how the open strings may be part of this. For example, the G string played open will be the root note G, so that counts as a root note position (also, therefore, at the 12th and 24th frets).
Root - 3rd - 5th intervals
These three intervals make up a major triad/arpeggio.

Root - 3rd - 5th - 7th intervals
We can see the root is a semitone (1 fret) above the 7th. Therefore, you'll know wherever the root appears, the 7th will be right behind it. These four intervals make up a major 7th chord/arpeggio.

So, you get the idea - explore different interval relationships across the wide scale patterns and relate them to the degree patterns from earlier - this allows you to effectively "connect the boxes".
For example, you could play a wide run, ending up inside the 6th position box where you could then play around just in that box pattern for a few bars. This gives your soloing a dynamic edge, because both styles of playing - boxed and wide movements - produce different sounds, even though you're still playing the same scale!
To learn how to use this scale pattern musically and fluidly in your solos, I highly recommend the Guitar Scale Mastery course for that crucial next step.
Thanks for your time and patience.

